
I only have one monitor, so it can be tedious working with my Raspberry Pi, having to move cords around every time I want to change something. Thankfully, our Pi comes preloaded with software to give us remote access to the command line, and all we have to do to use it is turn it on.
Let’s get started.
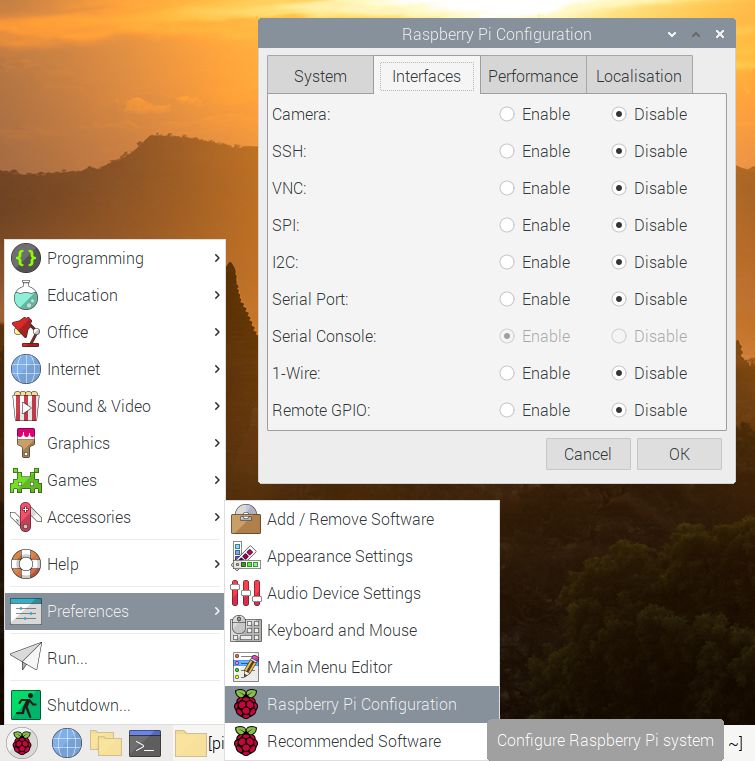
If you read my last article, you already know that we’re going to be using SSH to Securely access our SHell. To turn it on, navigate to Start > Preferences > Raspberry Pi Configuration and select the “Interfaces” tab where we’ll find an option to enable SSH on our Pi. Click “Ok” and it’s ready to go.
While we’re connected to our Pi, we need to find out our IP address. Open the terminal either by clicking on the  icon or pressing Ctrl + Alt + t. Type in
 hostname -I and hit Enter. A bunch of numbers and letters should show up on the screen. The first set of numbers is our IP address. Along with our username and password, we’re going to need the IP address to access the SSH server.

From here on out we should be able to do everything from our remote, Windows computer.
Installing PuTTY
To access the SSH server on our Raspberry Pi, we need to install PuTTY, available for free here. Make sure to download the package that includes all of the utilities because we’ll be using some of them.
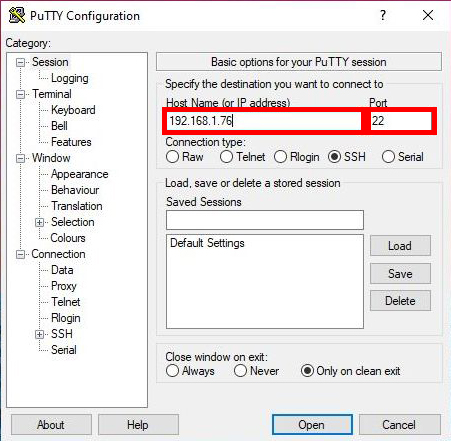
Once it’s done downloading and installing, start the PuTTY app. In the field that says Host Name put our IP address from earlier. In the Port field, put 22, the default port for SSH. Click Open and a warning will pop up letting us know that this is the first time the PuTTY software has attempted to connect to our Pi. Click Yes to indicate we trust the host (our Pi) and a window will open asking for our username and password. Enter those, and we now have remote access to the terminal.
To exit this window and close the program, type exit into the terminal.
Encrypting the Connection
As things stand now, we have remote access to our Pi, but so does anyone who can guess our username and password. We need a way to make it impossible to guess the password. To do that, we’re going to use something called public key encryption. You can read this article to learn more about it, but essentially, we’re going to make two keys. One, the public key, we’re going to put on our Pi. It’s going to ask everyone who tries to log in to our SSH server for the private key that we’re going to store on our Windows computer.
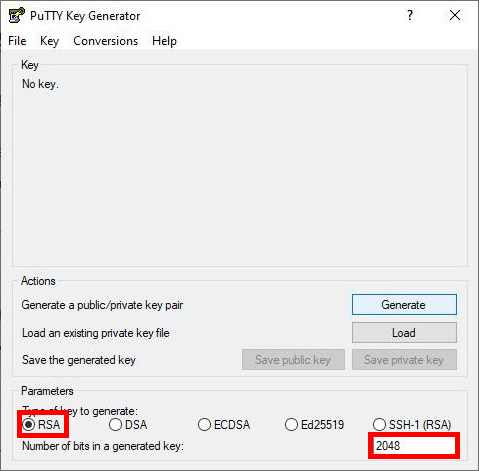
To make our key pair we’re going to use software called PuTTYgen that should be in the same place we saved PuTTY. After opening PuTTYgen, make sure that RSA is selected and the number of bits is 2048. Once that’s set, go ahead and click the “Generate” button.
When the process of creating the key pairs begins, PuTTYgen will ask us to move the mouse cursor around to generate randomness in our keys and make them more unique. When the keys are done being made we’ll see something like the image below.
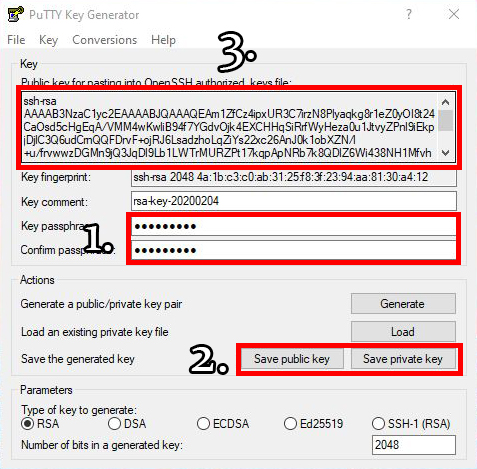
The first thing we want to do is give our key a passphrase. This adds an extra layer of security to our key. Next we need to save the public key and the private key. Keep them someplace on the computer where they won’t be lost. Finally, we need to copy the text of the public key to our Raspberry Pi.
The easiest way to move the key to our Pi is to use SSH. Leave the PuTTYgen window open and start a new SSH connection with our Pi using PuTTY. We need to make a place to store our public key where our SSH server knows to look for it. Make a new directory in the home directory by typing sudo mkdir ~/.ssh into the terminal, then navigate to the new directory by typing cd ~/.ssh.
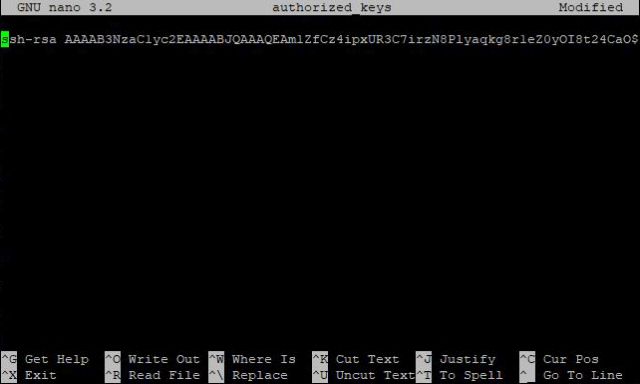
Inside the .ssh directory we need to make a new file called authorized_keys. There are a number of ways to do this, but I like to use the nano text editor by typing sudo nano authorized_keys. Next, highlight all the text in the box at the top of the PuTTYgen window and copy it to the clipboard by either pressing Ctrl + c or right clicking the highlighted text and clicking “Copy.” To paste the text into nano, click on the terminal window once to make sure it’s selected, then hold down Shift then right click in the terminal. Press Ctrl + x to exit nano. It will ask you if you want to save the changes. Press y to approve the changes, then press Enter to save the file as authorized_keys.
Next, we need to make sure our new file and directory are assigned to the proper user. Since I’m logging in as pi I want to make sure the .ssh directory and the authorized_keys file are assigned to me. To do that, we’re going to use the chown command. chown changes the owner of the file and the group of the file. Type in sudo chown pi:pi ~/.ssh/authorized_keys and sudo chown pi:pi ~/.ssh.
Now, we need to make sure that we’re the only ones with permission to change these files, but make sure that the SSH server can still read them. For this we’ll need to use the chmod command. chmod changes the mode of the file. In this case mode means the permissions available to the different groups of users on our Pi. First we need to change our authorized_keys file so that anyone can read it, but only we can change it. Type sudo chmod 644 ~/.ssh/authorized_keys. Next, we need to change the .ssh directory so that we’re the only one who can see what’s in it or add files to it. Type sudo chmod 700 ~/.ssh.
We’re almost done. We need to change the SSH configuration file so it knows we have an encryption key and we want to use it to log in. Type sudo nano /etc/ssh/sshd_config. At the end of the file, add these lines:
UsePAM no
PermitRootLogin no
AllowUsers pi
RSAAuthentication yes
PubkeyAuthentication yes
AuthorizedKeysFile .ssh/authorized_keys
PasswordAuthentication yes
Save and exit the file then restart the SSH server by typing sudo service ssh restart.
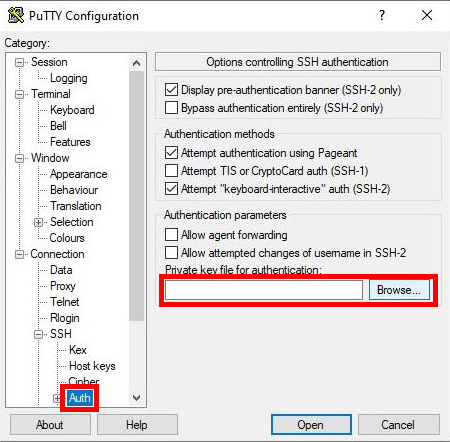
Now it’s time to log in using or key pair. Open PuTTY and set up a connection like we did before, but this time, before connecting, we need to add our private key, because now, our SSH server is looking for it. On the left side of the PuTTY window navigate to the Connection > SSH > Auth menu. Click “Browse” and select the private key file we saved earlier with PuTTYgen.
When we log in this time it will ask for our username, and the passphrase we used for our key pair. It won’t ask us for our Raspberry Pi password unless there was a problem with either of our keys.

Once we can log in successfully with our keys, we should remove password authentication, otherwise an attacker can continue to guess our password even without our key. To do that we need to go back to the sshd_config file (sudo nano /etc/ssh/sshd_config) and change the line PasswordAuthentication yes to PasswordAuthentication no, then restart SSH (sudo service ssh restart).
That’s it! We’ve got SSH set up on our Raspberry Pi and secured it using RSA encryption. There’s still room to improve our security, but this will keep the vast majority of attackers from gaining access to our Pi.